
First the materials needed:
1 yard fabric for the body and outside of the pockets – can be cotton, linen, or even canvas would be ok
½ yard fabric for the pocket lining and binding – should be quilting cotton or similar weight
½ yard Pellon 70 or other ultra heavy weight interfacing
½ yard Pellon 987F or other lightweight fusible fleece or fusible interfacing
1/3 yard Pellon 40, 50, or other lightweight interfacing
65 inches of bias binding, if not making your own
Extra-large grommet and setting tools
Thread to match backing fabric
1. Make your pattern piece. I find it easiest to make a paper pattern and cut from that. Follow the photo below. Also, make this all one piece of paper, I accidentally cut mine! Draw a horizontal line where the pieces would separate though. **If you do not have a serger, add a seam allowance on the bottom and the angled sides.**

2. Cut out your fabric. From the lining fabric, cut about 65” worth of binding. If you’re not sure how to do this try this tutorial. There may be better ones but this is pretty good. Also cut 3 pocket pieces. If you are only making this once, you can now cut the pocket pattern on the line you drew, otherwise fold. From the main fabric cut 2 pieces for the backing that measure 20” high by 14” wide (for the small organizer 20” high by 11.5” wide). Also cut 3 pieces from the small pocket pattern you just cut.
 3. Cut your interfacing. Cut a piece of Pellon 70 and Pellon 987F the same size as the backing. Cut 3 small pocket pieces of Pellon 987F and Pellon 40.
4. Fuse your interfacing. Fuse the Pellon 987F to the backing and the front of the pocket pieces. Follow the manufacturer’s instructions to do this. TIP: If you are using cotton as your main fabric and you see it bubbling after you fuse, rip off the interfacing and fuse from the front, keeping your iron moving and gliding it slowly across. This time it won’t bubble. Make sure no fleece is exposed to where your iron could touch it though! Also, this goes against ALL the manufacturer’s recommendations so beware. But it works for me.
5. Assemble the pockets. Layer the pocket like this: Pellon 40, front of pocket right side up, lining wrong side up, matching raw edges at the top. The sides of the lining will hang over a bit, just center it. Sew a ½” seam. Next spread the fabrics apart and press the seam towards the lining.


 Serger Instructions: Fold the lining over the top so that wrong sides are together and match the raw edges on the bottom. With the lining side up, serge the raw edges starting on the right side, this way if the fabric stretches it will just roll right into the lining band at the top.
Non-Serger: With right sides together, match raw edges at the bottom and press from the bottom up so that you get a lining band at the top. With the lining side up, start from the right and sew the sides and bottom. Leave about 2 inches on the bottom edge to turn, then turn right side out and press flat. (for the small organizer, just stitch the bottom edge)
Repeat for rest of pockets. Turn under about 1/2” toward the lining on the sides and bottom of each pocket and press.
 6. Put it all together! Line up the interfaced backing right side up over the Pellon 70. Pin in the center of each side to stabilize it while you sew. Start with the bottom pocket. Center the pocket on the backing (for the small organizer it will fit perfectly) and line up the folded bottom edge about 1.5” from the bottom . Pin or hold in place and starting a few stitches away from the sides, topstitch it right onto the backing about ¼” from the folded edge. Now line up the side of the pocket parallel to the edge of the backing, folding under the pressed edge and tucking it into the space you left unstitched. Stitch it in place like you did the bottom edge and repeat on the other side. (for the small organizer you don’t need to fold, the edge can just be basted into place) Repeat for the other two pockets, spacing them 1.5” from the top of the previous pocket.


 7. Finish it! Almost there, this is the last step! Line up the other backing piece and pin in place. Starting at the bottom, attach the binding using your preferred method. Now find the center point at the top, between the top of the pocket and the binding. Attach your grommet according to the manufacturer’s instructions. Now you’re done! Enjoy your mail sorter! Here are the finished photos of mine (sorry I was lazy so no grommets!)


 It was a lot of work though. I'm not sure if that's because I was making two at once or because of all the pieces and stiff interfacing. I'll just have to make another and see! Isn't this pink


 This game and others definitely contributed to my C in Organic Chemistry II my senior year of college! There are several versions, but in the one I have been playing a ruthless businessman named Mr.Big is planning to tear down a block of unique restaurants to build a Mega Foodplex. Flo, the waitress, has to help her friends earn enough money for their rent checks to avoid being taken over. The mechanics of the games are all the same. Flo seats the guests, takes the order to the counter, brings the food, takes the bill and clears the dishes. But there are all sorts of extra things that earn you points, like bringing a high chair to the tables with Families or serving drinks to unhappy customers. There are different types of customer and each has a personality quirk that may help or hinder you. The Families and Cell Phone guys are very noisy, and the Businesswomen and Bookworms don't like to sit next to them. They might even get up and leave if their happiness points go to zero. It would be too easy to just seat customers anywhere you want though, so the tables are laid out differently every time. Plus each customer wears a different color, and you get bonus points for putting them in the same color seat. As you progress through the levels, the game offers choices for decor upgrades, new food items for the customers to choose like appetizers and dessert, and little "helps" like you can call in a hostess or drink waiter, and seat customers on a bench while they wait for a table. It's actually very cool, there's a diner, pizza place, Mexican cantina and Japanese restaurant. So I guess that's my little plug for Diner Dash. Next up,


 Each one is lined with a piece of Insul-Bright (not sure if it will help keep my drinks cold or not but it was the right thickness) and backed with a plain complimentary cotton. Hopefully I'll be able to add these to my shop once I perfect my piecing skills. I don't know how quilters do it!


 There are some exciting new ideas floating around my head right now, and sometimes you just have to stop what you're working on and start creating before you lose the inspiration. So that's what I did yesterday after Ikea. I'm going out of town next week (this week? I guess so since it's Sunday) for work and thought I could use a new purse. I love my Charing Cross Sling in brown corduroy and pink flowers, but it's getting kind of dirty and I wanted something less casual. So I chose a black and white fabric from Ikea (if you look in the picture it's the top one in the stack on the right) and it's a whole new design that I think is going to be a hit! More details to come soon...it's still not done as my trip to Jo-Ann Fabrics to pick up supplies fell through, so I must go after work tomorrow. Don't worry, completed project photos will be up as soon as it's finished! I've also got two messenger bags in progress right now, basically I've been alternating between them whenever I get time to sew! Well I guess it's time to get back to work then!
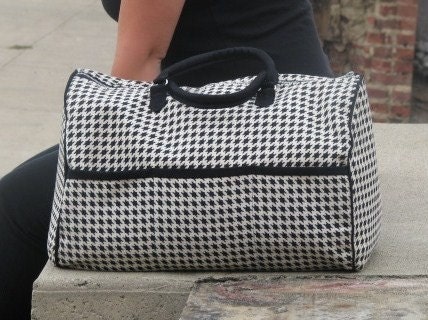